Categories
Travel

Top 10 Tips to Prepare For a First Time Cruise

If you’re going on a cruise for the first time and want some tips on how you can make it that little bit easier, read my tips below.

I’ve been on 4 cruises with P&O Cruises now. From 2 weeks in the Caribbean to a week in the Mediterranean. Over this time I’ve added small accessories to my luggage, as well as knowing what to expect when we arrive and depart. My list below is the top things to know and take with you (although I’ll probably need to make another part!).

Table of contents:

Black Tie Night – what are they? Do you have to do them?

Black Tie Nights are when you dress in your most fancy clothes to dine in the evenings. You would generally dress up for evening food and afterwards, if you’re seeing a show or going for a drink. You tend to get at least one Black Tie night on a 7-day cruise however our last 7-day cruise had 2. They tend to be on days when you’re at sea and aren’t docking anywhere.

If you don’t want to dress up, you don’t have to but the places you can go are limited. You usually aren’t allowed in the main restaurants, but going to the buffet and a few other smaller places is allowed. You’ll find out about where you can go in the daily newspaper you get each evening for the next day. This is either posted in your room or put in your post box outside your door.

We’ve only done one Black Tie night in our whole time cruising and weren’t impressed. We assumed it would be different somehow from the other nights, but the food was the same quality without any special entertainment/drinks etc.

Drinks Packages

Alcoholic and soft drinks aren’t in the price for a P&O Cruise. You have to pay, even for water bottles.

You pay for drinks packages which tend to have options for kids, alcoholic drinks, and non-alcoholic drinks. You can choose to buy a package either before or during your cruise. We aren’t big drinkers so we don’t buy one, as they’re pretty expensive. That being said, on our last cruise, we bought a bottle of gin from duty-free which you’re allowed to take with you (although buying booze at port stops isn’t generally allowed – they will confiscate it until you leave). Then we purchased tonics all week! This saved us a LOT of money.

For water, we refilled our bottles at the water stations within the buffet restaurants. You aren’t allowed to directly put your water bottle up to the machine due to health & safety – so we simply filled a mug up and then poured in our bottle – we didn’t get told off. Water from the taps in the room didn’t make us poorly but it didn’t taste quite right, so we opted for this. Water machines are located next to the outside bars (near where you sunbathe) and buffet restaurants, which are generally open all day. I think you can buy regular water bottles too from behind the bars.

Buying things onboard

You don’t use cash on board at all. When you first arrive in your room, outside in the post box you will have documents to read and a cruise card (each per person). This cruise card is what you use to buy everything – whether it’s a drink, an ice cream, an excursion, a dress from one of the onboard shops, or even buying euros from reception.

You’ll also use it to get on/off the ship. It’s pretty important to keep a safe hold of it until you leave.

Daily Newspaper Agenda

Each afternoon, your room cleaner will put a newspaper in your room relevant to the next day (or leave it outside your room door in the post box). This newspaper has a lot of useful information in it, such as excursion times, “what’s on” from films to evening events, and opening times for all the restaurants.

It gives a brief overview of the place you’re docking, and what type of night it is (Black Tie for example).

Excursions can be expensive

You can book these either before the cruise (you pay upfront), or during the cruise when you can use your onboard spending money to pay for them. You’ll find out how long the cruise takes, plus any transfer time.

We’ve found the full-day excursions take anything from 1-3 hours travel time to and from your destination which is a long time to sit on a bus, especially if you hate being on buses! These longer ones tend to include food, but be weary if you’re fussy or a vegetarian – the options (in my experience) are always lacking so we end up visiting the buffet restaurant, or grabbing a pizza on our return!

Some of the shorter excursions don’t include food, so always worth checking and taking pastries from breakfast. These shorter ones can also be expensive. Our most recent cruise was to Malta, where an excursion cost £30 to take you into the town centre – we walked it in 30 mins whilst sightseeing. We’ve shared taxis with others before, to save on costs. Worth knowing though that if you’re late back to the ship and you aren’t on an excursion, they can leave you behind!

Pack light – limited room!

Unless you’re a lucky so-and-so who’s booked a suite, the bathroom shelving sizes are quite small. I would suggest packing light and using reusable small bottles for things such as shampoo, conditioner or any other large bottles you’ll only use a few times, to save on counter space.

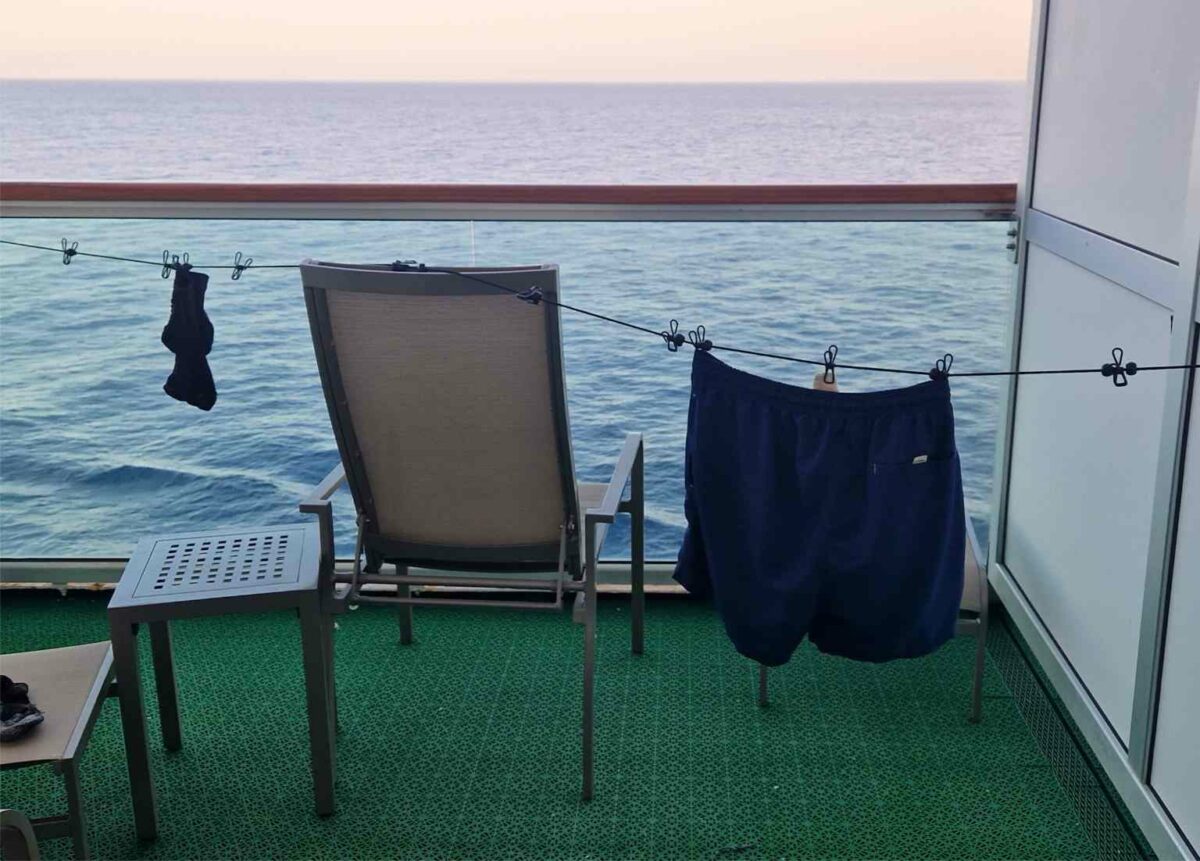
Got a balcony? Buy a clothes line!

We tend to get a balcony room and make full use of the outside space! We bought this clothes line which is extremely handy for drying your clothes during the day/night. You can get things cleaned but it’s pretty expensive to have them do this for you. We bought ours for £5 from Amazon.

Buy a cheap washing line to use on your balcony
Buy a cheap washing line to use on your balcony – otherwise you’ll be stuck if you need to dry your clothes

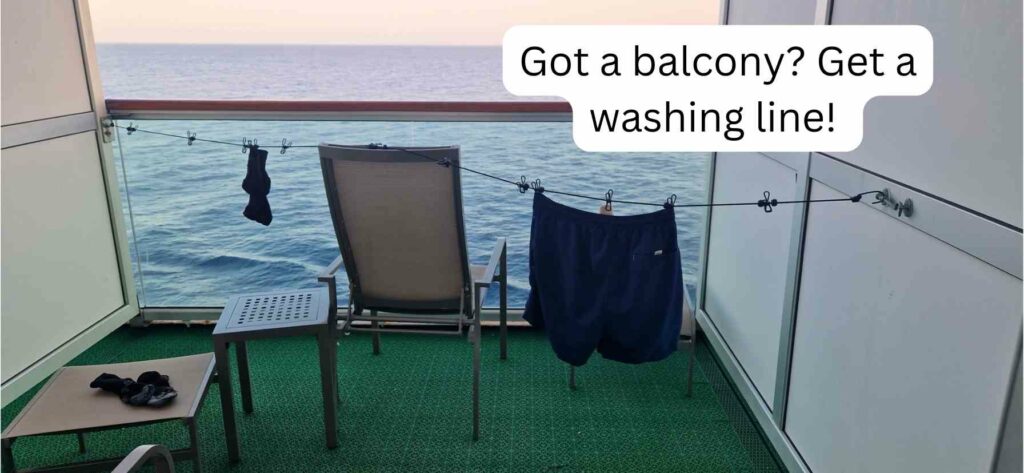
Otherwise, you’ll be stuck with this:

Washing line - P&O Cruises
Washing line in our bathroom – not the most efficient!

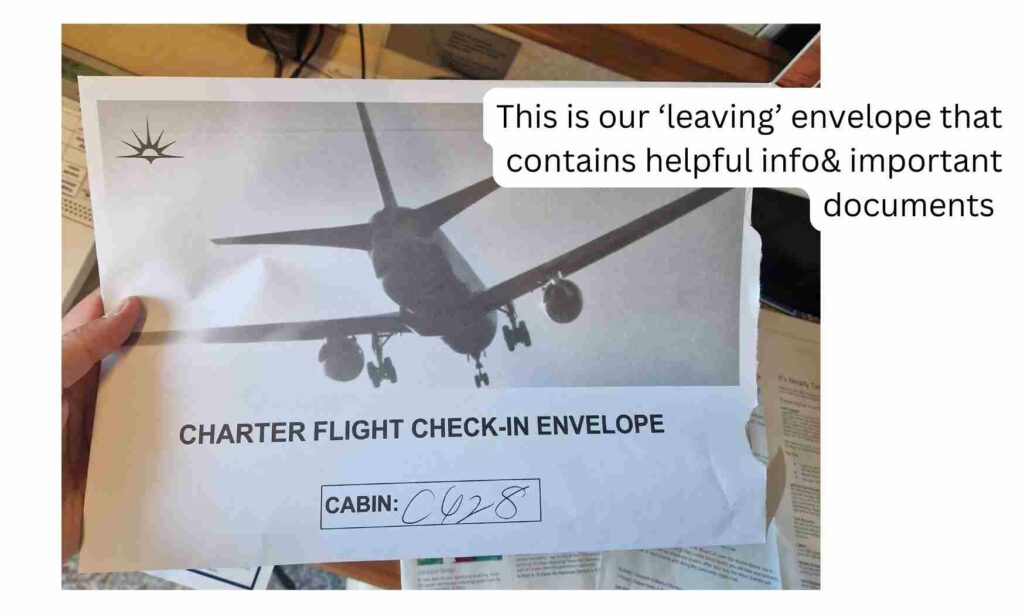
Hometime – what happens?

In the daily newspaper already mentioned, you’ll also get an envelope the morning of your 2nd-to-last day. This envelope includes important and helpful info including:

  • How to organise your suitcase
  • Boarding passes
  • Luggage tags
  • Flight times/what time to be ready and where
The leaving envelope you get the day before you leave includes helpful information and important documents
Instructions on flight times when it's time to prepare to leave your cruise
Helpful info part of the envelope you get when leaving – this includes flight times and where to meet before leaving the ship
Sorry, it’s a bit blurry – this is what you get in the leaving envelope; more helpful information.

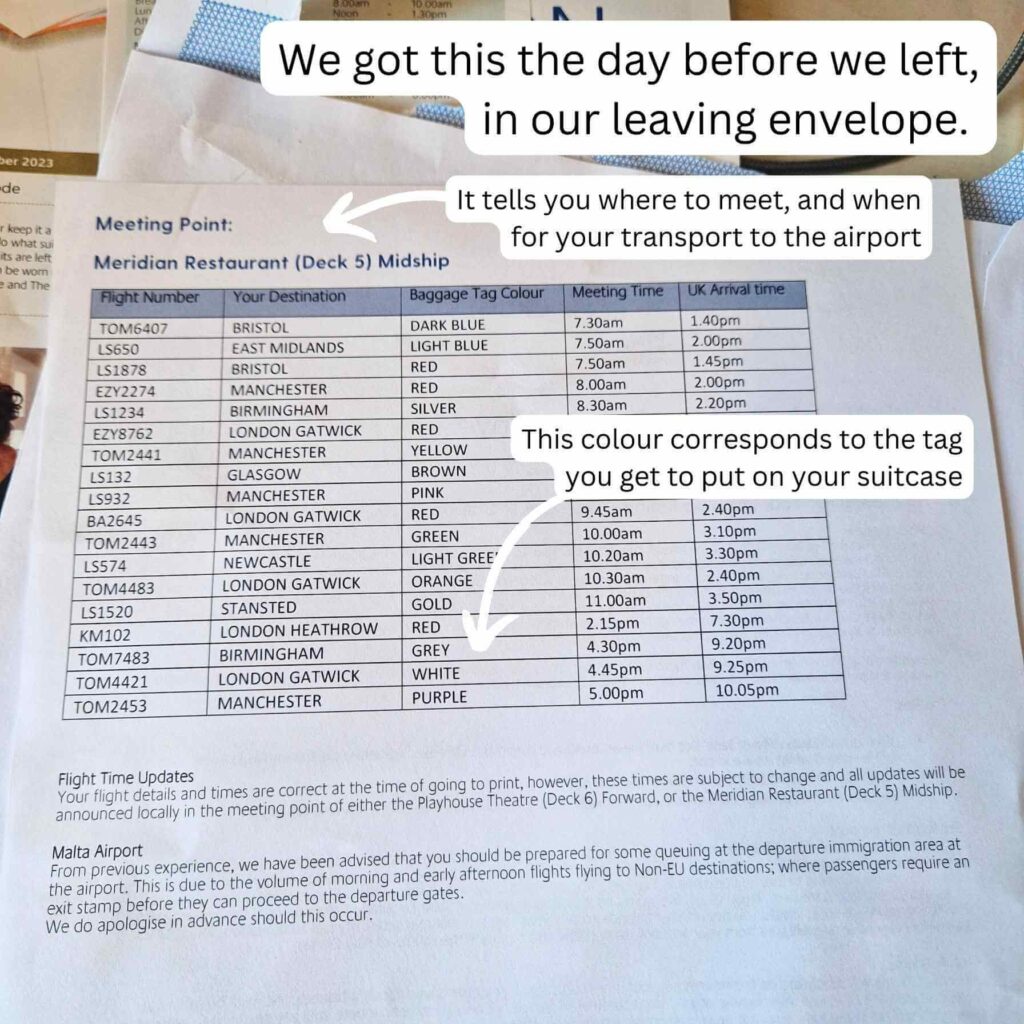
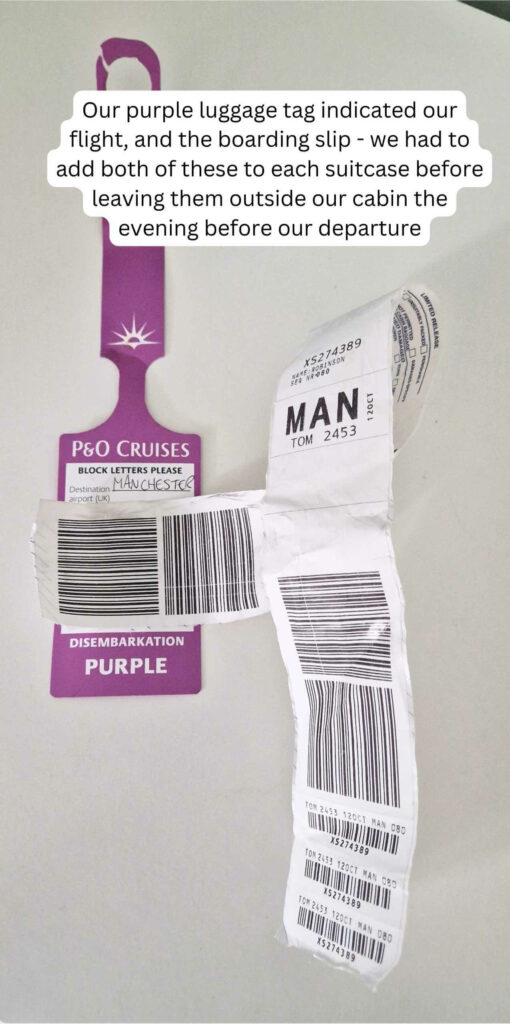
We were flying on Thursday at 5pm, and had to have our suitcases ready for collection the previous evening – yep, that’s right – from midnight we didn’t see our suitcase again until we got back into Manchester. We also had to be out of the room by 8am to allow the staff enough time to clean the room before the next guests arrived that day. Not ideal but had to be done.

You have to leave your suitcases outside the room the previous evening, with all luggage tags added. You get these in the envelope.

Our luggage tags and boarding slip for our suitcases
Our luggage tags and boarding slips for our suitcases

As we had most of Thursday to wait for our departure time, we left the ship and walked around our port – for this holiday, it was Malta. We could have stayed on the ship and enjoyed a day of sunbathing. You obviously still have access to everything; the gym, restaurants etc. When we got back from walking around Malta – at around 3pm, we had a shower in the gym and some food, then chilled reading until 5pm when we had to make our way to the restaurant to be organised to leave.

Dining

Evening dining is a little bit different. You have the buffet where you can just turn up, plate the food yourself and sit down wherever. There are a few speciality restaurants where you book and they have a cover charge (anything from £10-£30) and lastly, you have the main restaurants offering Club or Freedom Dining. The difference is with Freedom, you can turn up at any time and sit in a different place. With Club, you sit in the same place at the same time each evening. Read more here. We tend to stick with Freedom and ask for a table for 2. Cruises tend to recommend being open to socialising, so sharing tables. We sat near tables of 5 couples who enjoyed sharing their evening with others.

Get lost

I wouldn’t try to find your way around the ship, especially the bigger ships, as you’ll only frustrate yourself (or is that just me?). We stayed pretty much in the middle of the ship, so we got familiar with where our closest lifts were, and how to get to certain places like breakfast etc.

Find your preferred place to sunbathe then get familiar with how to get to places you’ll visit often – the bar, toilet, restaurants etc. This made my life less stressful as I no longer worried about getting lost!

Some lifts only go to certain floors. For example:

  • the lift at the FRONT of the ship might only go down to level 6 so if you want to go down to level 5, you’ll need to walk across to the next set of lifts and either walk down 1 flight of stairs or take a lift down 1 floor
  • the lift at the BACK might be the only one to go UP to your preferred sunbathing spot – the lift in the middle of the ship might go up to floor 16, then you’ll need to walk up 1 flight of stairs or walk to where the lifts can take you the remaining way.

Sometimes you have to walk to more lifts to get to the floor you want, or use stairs. Don’t worry about this – look and study the map you get with your cruise card.
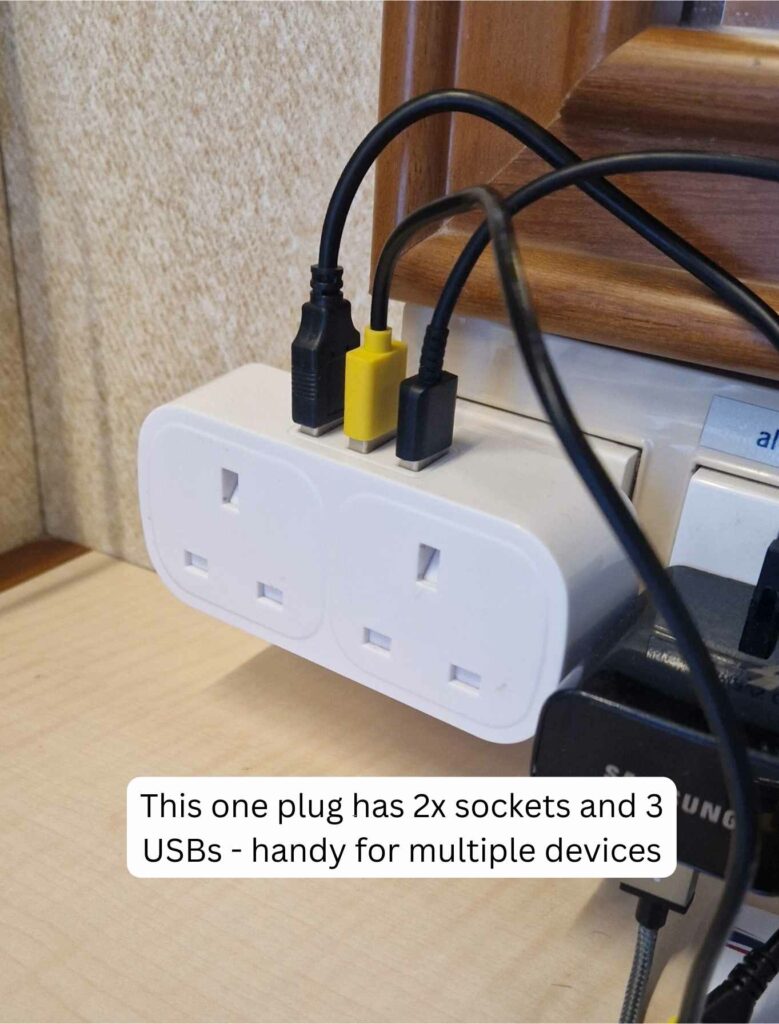
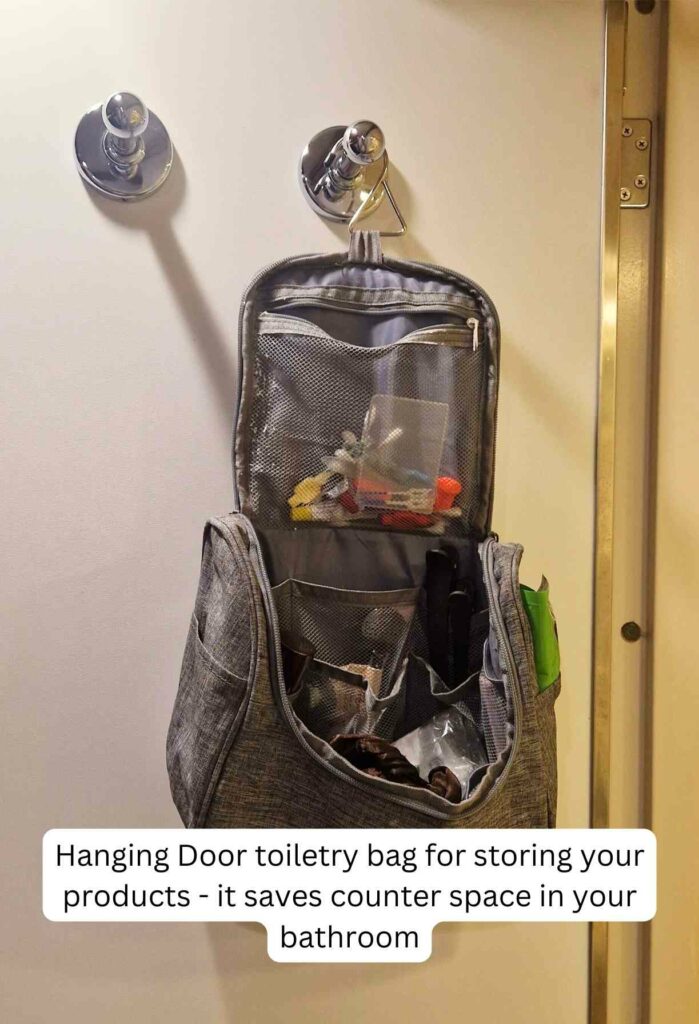
Other tips

I only wanted this blog to be top TEN tips so I’ll combine this next one! I would recommend buying these useful items:

  • Adapter with several plugs and USB – no more fighting for space! This one cost us £14 from Amazon.
Charger with multiple plugs and USBs
  • The bathroom is small with limited space, so I take pretty much everything in smaller plastic bottles to reduce the space needed
  • A hanging toiletry bag you can hang from a door that contains your products helps reduce room taken up in your bathroom. I have the small & large sizes – WANDF brand here from Amazon.
A hanging door toiletry bag is SO useful for reducing clutter in your bathroom
You don’t get much bathroom surface space, so I use a hanging door toiletry bag for everything
  • Packing cubes! They’re so handy for keeping things organised. You can take them from your suitcase into drawers and keep your dirties in one, making sorting washing on your return quick and easy. If you aren’t sure, I’d buy cheap ones and then invest in some good quality ones. I got a pack of 6 (3 sizes) from LeanTravel for £45. Worth every penny.

• • •

Thanks for reading :) This article is tagged with:

Categories
Skincare

Dermatica Prescription Skincare – 4month review before and after photos

After returning from holiday, I had full-blown hyperpigmentation from sun damage across my forehead and down the sides of my face. It wasn’t anything I’d experienced, mainly acne and oily skin. This was entirely new for me so I had some investigating to do.

Dermatica personalised skincare with Tretinoin Hydroquinone Niacinamide Azelaic Acid
Nov 2022 – My hot, abroad holiday seemed to worsen my skin as you can see here. Lots of pigmentation, and dryness not to mention (undiagnosed) fungal acne

I’d always had a slight discolouration on my forehead after getting burnt a few years ago, but going on holiday in the sunshine not only gave me a tan, but made the melasma so much worse as you can see. My forehead and sides of my cheek came out worse – this is in November 2022 just after my holiday.

I had no idea what it was, so obviously Googled it and found it’s Melasma which is similar to hyperpigmentation, but even after reading a lot, I’m still not 100% sure what the difference is. I think Melasma is symmetrical whereas hyperpigmentation is in smaller, more condensed areas. As soon as Dermatica saw my photos, they instantly told me I need treatment for Melasma so that was that.

Table of contents:

What is Dermatica and how can they help?

Dermatica offers personalised skincare with strong prescription ingredients, such as Tretinoin, which is what my formula includes, to reduce the melasma.

Dermatica personalised skincare with Tretinoin Hydroquinone Niacinamide Azelaic Acid
Different types of problems Dermatica can help you with – photo taken from the homepage

You start your consultation online by answering questions and uploading photos – this allows the Dermatica team to review to ensure they recommend the right products.

You upload photos every month or so into the online system so it’s really easy to look back and compare.

Dermatica personalised skincare with Tretinoin Hydroquinone Niacinamide Azelaic Acid
My progress photos in my Dermatica account

It’s a personalised service, which is one of the main things I was looking for. I wanted something to help that was tailored to me and matched my skin; I didn’t want something random from Boots or The Ordinary (although I love them) that’d be too harsh and worsen my skin. I wanted something to help as quickly as possible.

Tretinoin, 0.05% per tube - the first 2 months was 0.025

Hydroquinone, 4% per tube

From looking at my upcoming formulas, they are introducing Niacinamide 4% and Azelaic Acid 4% in September (this will be my 5th month)
This is my Dermatica product – simple but nice packaging with a helpful leaflet
Tretinoin, 0.05% per tube - the first 2 months was 0.025

Hydroquinone, 4% per tube

From looking at my upcoming formulas, they are introducing Niacinamide 4% and Azelaic Acid 4% in September (this will be my 5th month)
Each delivery includes a handy leaflet explaining the process and helpful information

What’s in the Dermatica personalised formula?

Your formula is personalised but I’m happy to share mine. I’m using Dermatica to ‘fix’ my melasma/hyperpigmentation.

This is why I was happy to go with Dermatica. The formula is personalised and tailored, meaning the formula is changed as my skin does. My skin has been using the above ingredients since my first order at the end of May (so let’s say June). My skin has had time to get familiar with the ingredients to reduce irritation before it changes.

My treatments so far:

  • 1st tube, May 2023 – Fluocinolone Acetonide 0.01% + Tretinoin 0.025% + Hydroquinone 4%
  • 2nd tube, June – Fluocinolone Acetonide 0.01% + Tretinoin 0.025% + Hydroquinone 4%
  • 3rd tube, July – Tretinoin 0.05% (increased from 0.025) / Hydroquinone 4% cream
  • 4th tube, August – Tretinoin 0.05% / Hydroquinone 4% cream

My 5th month is going to be in October rather than September, as I’m a little behind in product so I can skip a month. October includes – Tretinoin 0.05% / Niacinamide 4% / Azelaic Acid 4%. I’ve been putting it on every night so I’m not sure how I’m so far behind. The product seems to last for ages even with the smallish tube.

Before and after pictures

When you first purchase, you upload 3 photos – front, left and right. These photos are what the experts use to determine what to put in your formula to fix whatever problem you’ve mentioned.

The photos are also kept within your online account, so you can refer back to see how far your skin has come. You aren’t likely to notice a difference when you’re looking at skin every day, so it’s nice to see the photos side by side (if not a bit cringe).

Dermatica personalised skincare before after pictures
This is in my online account – you upload photos every month or so to easily compare and look back to see if your skin has improved
Tretinoin 0.05% / Niacinamide 4% / Azelaic Acid 4%
1st month of using Dermatica – May 2023

From the first photo at the top of this blog back in November when I got home from holidays, I waited a few months as I wanted to finish all of my existing products. You are advised to reduce using other products with Dermatica as they can affect the results. You can still use SPF and makeup though, see more info further down this blog.

Tretinoin 0.05% / Niacinamide 4% / Azelaic Acid 4%
2nd month of using Dermatica – June

The lighting is different but you can’t see much difference. It says on the website it can take anything up to 8 weeks to see a change.

July, below, is probably the most dramatic change.

Dermatica personalised skincare with Tretinoin Hydroquinone Niacinamide Azelaic Acid
3rd month of using Dermatica – July
Dermatica personalised skincare with Tretinoin Hydroquinone Niacinamide Azelaic Acid
4th month of using Dermatica – August. These pics were taken just before my period so my forehead is more spotty than usual.

I’ll keep updating this blog with new months.

How long do the results take?

It says on the website results can take anything from 8-12 weeks. I saw a difference within 6 weeks but most noticeable after 2 months.

If you don’t see any results, you can get in touch with them to discuss and they will look at/change your formula. It’s personalised to you, so it should be working for you. If you aren’t seeing a difference, I’d double-check what else you are using – other products could stop Dermatica from working. Are you using enough product? I put at least 1 pump worth on each night before bed.

How and when do you use Dermatica?

I put one pump on my face before going to bed. I was using 2 pumps, but found my skin going slightly sensitive, so reducing back down to one has made my skin feel better again. I apply it then clean my teeth, giving the product at least 3 minutes to sink into my skin. I finish off with moisturiser.

How much is Dermatica and are there discounts?

Your first monthly order is £2.90 then it increases to £24.99 per month or you can buy as a subscription which gets you discounts, see the below photo (or use my discount code, see below).

Each month you get a tube of product which slowly changes to increase certain ingredients as your skin gets familiar with it.

Dermatica personalised skincare with Tretinoin Hydroquinone Niacinamide Azelaic Acid
Dermatica price options if you take out a subscription

Want a discount? Click on my link below to get your first month for £2.90 and 10% off your next one:

Click here to use my link then add ‘ahoybeauty’ to the discount box on the payment page – see below for what it should look like.

Can you use other products alongside?

They recommend you don’t, as it could stop Dermatica from working or interacting. You can still use it with SPF though, and make up.

Dermatica’s official stance is on their website:

The active ingredients that we use can increase the sensitivity of your skin. So, we recommend keeping your skincare routine simple. A cleanser, moisturiser and sunscreen are more than enough during treatment. Exfoliants and toners containing salicylic acid, AHAs, BHAs, glycolic or lactic acids should be avoided. They can increase the sensitivity of your skin, and our treatments will help to exfoliate the skin. Products containing retinols can promote further peeling, and should also be avoided. Vitamin C can be used in the morning if you apply your treatment at night, and hyaluronic acid is fine to use. You will get a guide on how best to integrate your treatment into your current regime. Our dermatology team are also available when needed to check on any other ingredients.

In Dermatica FAQs

See the Dermatica full FAQ section here.

• • •

Thanks for reading :) This article is tagged with:

Categories
Health and Wellbeing

London Nootropics Adaptogenic Mushroom Coffee review: My Top 10 Favourite Benefits

After buying 8 large boxes since February 2022, I’ve got a thing or two to say about London Nootropics mushroom coffee!

One of the biggest changes is how it’s replaced my morning filter coffee – my favourite thing. I now have ‘Flow’ which is one of the flavours available from the brand.

Changing coffee to mushroom coffee has lowered my anxiety, reduced jitters and actually helped me to concentrate for longer periods of time. I wouldn’t go back to normal coffee now for these reasons plus I don’t miss the crash!

Here are my top 10 favourite things about London Nootropics Adaptogenic Mushroom Coffee:

  1. Dragon’s Den Backing: The brand received support from two dragons, demonstrating their credibility and passion.
  2. Flavors and Benefits: They offer a variety of flavors infused with beneficial ingredients like ginseng, lion’s mane, and ashwagandha.
  3. Pure Natural Ingredients: The coffee is made from high-quality natural ingredients, free from artificial additives.
  4. Balanced Energy: Unlike regular coffee, it provides a sustained energy boost without sudden spikes or crashes.
  5. Mushroom Coffee: It contains medicinal mushrooms known for their antioxidant properties, immune system support, and anti-inflammatory effects.
  6. Pleasant Taste: Despite being mushroom coffee, it doesn’t taste like mushrooms and offers a unique and enjoyable flavor.
  7. Mental Well-being: The inclusion of adaptogenic properties helps the mind and body adapt to stressors, promoting balance and well-being.
  8. Compatibility with Milk: It blends well with different types of milk, including soy, oat, and regular milk. I have on its own too with just hot water. It’s delicious!
  9. Convenient Sachets: The coffee comes in sachets, making it easy to take on-the-go and enjoy a delicious cup anywhere.When I visit the office for work, I usually take 2.
  10. Subscription Option: Their monthly subscription box provides a cost-effective and convenient way to enjoy the coffee regularly. I have a ‘big box’ on regular 2-month order, for £48.

Get 10% off with the coupon code ahoy10 (add on basket page) – referral code: https://londonnootropics.com

If you’d like to read more about the flavours and the boxes, read my thorough London Nootropics blog here.

london nootropics mushroom coffee review - zen cbd ashwaganda
london nootropics mushroom coffee review – zen cbd ashwaganda
London Nootropics big box - 3 flavours, 60 sachets
London Nootropics big box – 3 flavours, 60 sachets
Morning coffee 'mojo' with soya milk
Morning coffee ‘mojo’ with soya milk

• • •

Thanks for reading :) This article is tagged with:

Categories
Skincare

Facetheory Skincare to the rescue after painful acne – my honest review

Facetheory is a UK-based skincare brand; Leaping Bunny & PETA approved. I’ve been using them for years, as being a bit lazy, I love it when a website makes it super easy to choose products right for you. I go for products to support with oily skin, acne and hyperpigmentation.

They have a ‘routine builder’ on their website which asks you a few questions and at the end, suggests several products. I did this, but I used it more of a guide. Once I knew the key products (moisturiser, vitamin c etc) I then looked and found my own favourites.

I’ve been using the Supergel moisturiser since 2019 but recently purchased more products, including some for my husband who has the opposite skin to me. Mine is oily, acne-prone and not very sensitive. His is very sensitive, dry and he has redness.

Get 20% off your first purchase with my friends and fam link >

My new routine with Facetheory after painful fungal acne

photo of my cheek with painful acne
Photo of my skin after holiday – painful bumps so I stopped all products and began with FaceTheory which has transformed my skin

After coming home from holiday, I had really sore skin. I haven’t been properly diagnosed, but I think I had fungal acne, caused by all the oils in the Elemis cleansing balm I was using to remove makeup 🙁

It caused such a big, painful flare up, I stopped using all products and investigated until I was 99% sure what my next steps were to be.

I cleaned out all products that contain anything that would aggravate the fungal acne (basically 90% of products) and purchased new products – the majority being from Facetheory.

Facetheory benefits
Facetheory benefits – from their website facetheory.com. The products are super clean.

Get 20% off your first purchase with my friends and fam link >

My favourite things about buying from Facetheory are:

  • most products don’t contain anything that’ll trigger fungal acne
  • all products are vegan and cruelty-free
  • prices are affordable (although there’s been a recent 2023 price increase – more on that below)
  • setting up subscriptions for my favourite products so I never run out, plus get a small discount
  • you get offers and discounts often in your inbox and accrue points for each order (4 points = £1, but they have tiers depending on how much you spend – the lowest is 2 points per £1)
my favourite Facetheory skincare products

My favourite Facetheory products to use on my oily, acne-prone skin

Vitamin C

Regena C30 Pro Vitamin C Serum with 30% Ethyl Ascorbic Acid (£34 although I pay less with subscription)

I use a small blob of this every morning before moisturiser. It contains 30% Ethyl Ascorbic Acid, to target dull and uneven skin, signs of ageing, inflammation and acne bacteria. 30% is quite high, so Facetheory also make a 20% version.

It’s reduced my hyperpigmentation especially on my forehead, and made my skin look more awake.

Facetheory regena vitamin c serum - skincare review
Regena Vitamin C serum – I use 2 drops in a morning
Facetheory regena vitamin c serum - skincare review
Regena Vitamin C serum – I use 2 drops in a morning

Moisturiser

Supergel Oil-free Moisturiser M3 for Oily and Acne-Prone Skin with Aloe Vera and Niacinamide (£16)

I absolutely love this moisturiser. It’s made for people with oily and acne-prone skin, but my husband uses it and he has very sensitive skin. He loves it as it’s “really thin, easily absorbed and doesn’t dry out my skin”. He’s bought his own tube now so I get mine back!

It contains Niacinamide which helps to reduce pore size. Salicylic acid helps congested skin without causing irritation or any redness. I use this moisturiser under SPF.

Facetheory supergel moisturiser skincare oily skin review
Facetheory Supergel moisturiser I use every morning. It’s super light-weight and slides into skin – no stickiness

Toner

Cera-C Pore Reducing Toner T1 with Niacinamide, Ceramides and Vitamin C (£15)

Next up is the toner, which has tons of goodies, including Niacinamide to balance oily skin and reduce pore size. It also contains Ceramides to help your skin retain moisture, Panthenol to absorb moisture, and Vitamin C to help fight breakouts and brightens skin.

I use this toner with a cotton pad. I use one side on half my face, then turn the cotton pad over and clean the other side of my face. I tip the bottle top vertically over the cotton pad, giving me about a pea-sized amount to work with. This is so I don’t go back over clean skin with the dirt from another area.

Facetheory cera c pore refining toner skincare review oily skin
Facetheory cera c pore refining toner – this bottle was a free sample but I now buy the 200ml beast size

… plus I use the Freshening Face Wash C4 (£11) for a cleanser and Hylafecta 2% Hyaluronic Acid Serum S14 (£22), which aren’t on my subscription list, yet.

Face Wash

Freshening Face Wash C4, £11

I use this both in the morning and at night. It contains Green Tea Extract to detox and remove impurities, and Aloe Vera to soothe and clarify. It’s £11 and comes in a chunky 140ml glass bottle with an easy-to-use pump.

Facetheory skincare review moisturiser vitamin c hyaluronic acid
My full morning staple routine from L-R: face wash, toner, vitamin C, hyaluronic acid, moisturiser

So basically my skincare is 90% covered with Facetheory. And my skin has never looked better for it.

What are the products like?

As mentioned above, I have 3 products on subscription I get every few months. I love them all as they’ve completely changed my skin.

My husband uses the same moisturiser as me (Supergel) and swears by it even though we’ve got completely different skin. His skin is very sensitive so he usually doesn’t use any skincare because they make his skin worse, but he’s been using Supergel for months now and has even branched out to use the Amil-C Whip M5 SPF 30 and another moisturiser, Aventhra Moisturiser M2.

Supergel moisturiser is very light so a pea-sized amount is able to glide over and cover your whole face.

My discount code

Through my account I get a friends and fam code. Use this link to get 20% off your first purchase (I also get points if you do this!)

Facetheory.com with 20% off link >

Recent price increases

I have several products on subscription so I was able to lock in the prices before the increase in early 2023. Some increases are a few pounds, but others have increased quite considerably.

Regena C30 Pro Vitamin C Serum with 30% Ethyl Ascorbic Acid, 30ml, was £26.99 in Dec 2022. I purchased it again a month later (Jan 2023) for £22.94 then again at the end of March for £28. It’s now £34 on the website. I get it for £22.94 as I locked-in this price as a subscription.

The Supergel moisturiser was £12.74 in Jan 2023, and is now £16. It doesn’t seem much but it’s still an increase of 25%.

If you’re looking to purchase from them, I’d suggest signing up for an account and signing up to their newsletter. They have offers going all the time, so you’ll be sure to bag a bargain if you keep an eye out.

Or use my code to get 20% off your first order (I also get points if you do this!)

Get 20% off your first purchase with my friends and fam link >

• • •

Thanks for reading :) This article is tagged with:

Categories
Fitness

BEIS Sport Sling Crossbody Bag in Beige – my full review

After buying the expandable backpack in September 2022, I’d been keeping my eye out for the sling to be available, as it’s currently out of stock everywhere.

Little did I know my eagle-eyed husband signed up to receive stock updates on Revolve.com, and managed to snag one in the days it was in stock.

It’s due to be £58 on the UK BEIS website. He bought it from Revolve.com for £58 but got a 10% discount code by signing up to the newsletter (£52). Fedex cost £7 so all in all, he paid £59.20.

What are the key selling points?

I’m listing below the gadgets on the bag that make it such a dream to use, but my favourites have to be the key loop (I can never find my keys in bags no matter the size) and the expandable hidden pocket to the side perfect for a water bottle of flask.

The key loop – always find your keys easily!

The key loop on other bags is hard and difficult to use. I always end up breaking a nail or hurting my finger, and being so frustrated I end up not even using the loop. The key loop on the BEIS is incredibly easy to use – it’s big, and a little soft making it bendy and really easy to hook/unhook your keys. It’s also in the main compartment too, ensuring there’s enough space for them as well as anything else you decide to add (such as a purse, phone).

Use my friends and fam link for money off – BEIS.com

Beis sports sling bag review in beige - key chain
The key chain is big and easy to use, as are the zips!

Big zips – easy to grab!

It sounds obvious, but I struggle with my other cross-body bags because the zips are so small – it takes more effort than it should to actually get into the bag. With the BEIS, the zips are big making getting in and out of the bag a breeze because you can find them easily!

Hidden expandable pocket – great for flasks/water bottles

The hidden water bottle pocket fits my flask in, but it’d also fit a taller bottle too. I personally have a flask that’s 345ml and a water bottle that’s 530ml and can use either in the pocket – the weight isn’t too much for my shoulder. As the strap is quite wide, it distributes the weight.

If you don’t need/want to use the pocket, it doubles as a hidden pocket at the side you can use to store flat things, such as credit cards or even a small phone. I use it for my flask, especially on walks and it’s comfy – the weight doesn’t move the bag around on my body; I don’t have to keep readjusting (something that gets on my nerves with other bags that have smaller straps).

Beis sports sling bag review in beige
The hidden pocket perfect for bringing on the outside for drinks
Beis sports sling bag review in beige

As you can see above, the hidden pocket can be used to hold a drink. In this picture, I’m using my husband’s Nespresso flask which holds 345ml.

Left or right side? You can have either!

I really like how it fits to my body. It almost curves around my side, hugging me making it easy to dip in and out of pockets. If you want to change the side it’s hanging on, it’s easy to do so by moving which side the strap is attached to.

Beis sports sling bag review in beige
There’s a clip on each underside, allowing you to change the left/right cross-body

Card holder – instead of taking a purse!

The card holder (3x slips) makes it so you don’t need to carry a purse. I personally use them to hold coffee sachets and cards when I go for a walk and need my debit card for a coffee! They aren’t difficult to use either, there’s space so you won’t need nails to prise the cards out.

Use my friends and fam link for money off – BEIS.com

I’m a bit lazy and never shut things properly – whether that’s cupboard doors, regular doors or my sock drawer. When the bag is hanging on my side because of the inner lining attaching to the sides, I don’t need to shut the pockets completely, making getting in and out SO MUCH quicker without the worry anything will fall out.

Pockets, pockets, pockets – I love pockets

The pockets, in particular the large pocket, opens all the way down both sides. Unlike other bags that only open an inch or two from the top, this makes it very easy to put items in but manoeuvre them around if you’ve got a lot to fit in.

Beis sports sling bag review in beige

The large inner pocket has a fabric feel, so you can put your sunglasses or your phone in the pocket without any worry it’ll get scratched. Such a simple but amazing idea – who wants to carry a big sunglasses case? I certainly don’t.

Beis sports sling bag review in beige
@ahoybeauty

things about my new @Beis Travel sports sling crossbody bag that just make sense. for me it’s all about the water bottle pocket and key leash

♬ original sound – Genius – Genius
Here’s my Tiktok video explaining my favourite bits of the BEIS Sport Sling bag

When will you use it?

I’ve used it so far for:

  • dog walks
  • after-work food shop
  • nipping into town to sort errands
  • seeing friends

I’ll use it when I go on holiday, especially in the airport, as well as my BEIS expandable backpack, so I can easily grab my phone or cards instead of having to go into the big bag.

Use my friends and fam link for money off – BEIS.com

Got anything you DON’T like?

Hate to say it, but yeah – the colour! I like the colour, but when it’s next to the ‘beige’ BEIS expandable backpack, it’s a different colour. Not ideal if you want to wear them together and get the whole set (the suitcase is on my list!)

Beis sports sling bag review in beige

Where can I buy the sports sling?

My husband got the sports sling from Revolve.com and had it delivered to the UK, but there’s also a UK BEIS website version.

Use my friends and fam link for money off – BEIS.com

What’s your honest review?

I’ve been using it for a month now. I use it every time I go out, whether that’s to see friends, family, dog walks or downtown.

If I’m going shopping I take a tiny fold-up bag within the sling and use that if I buy anything. I know this seems a bit ridiculous but it saves carrying a larger bag if I then don’t buy anything to go in it. I also really love having stuff close to me, and I know where each thing is now inside the bags, so it’s easy to find anything. If I have a larger bag, it takes me ages to find anything!

• • •

Thanks for reading :) This article is tagged with:

Categories
Skincare

9 tips on how to reduce acne and take care of your oily, hormonal skin

For the past few years I’ve started getting a lot of spots the week before my period is due – bigger spots around my face and smaller ones across my forehead. Not only that, I also get spots throughout the month – on the sides of my forehead, my cheeks and my chin. After a lot of reading and getting advice from friends, my skin looks more glowy and any spots I do get fade a LOT quicker than what they used to.

Here’s my list of my top 10 things to do, and not do, to help reduce the amount of spots you’re getting:

  1. Don’t pop them!
  2. Review what you’re putting on your face
  3. Use clean towels
  4. Use clean pillow cases
  5. Are you removing all your make up?
  6. Clean your make up brushes
  7. What make up are you using?
  8. What vitamins are you taking?
  9. Get a spot clearing gel

Don’t pop spots

You don’t have to tell me how hard this one is. There’s not much else better than popping a good spot and having the gunk ooze out. But this is doing your face no good at all. The white stuff in a spot is actually magical liquid helping to GET RID of the spot. So guess what? By squeezing the white goodness, you are 1. removing the goodness fighting the spot 2. making the bacteria go further into your skin increasing the size of the spot and increasing the time it takes to go 3. probably going to leave yourself a scar.

Tips for leaving your spots alone

Don’t look in a mirror.

When I get in and take my makeup off, my most popular time of day for a good spot-popping session was after my evening shower, after I’d taken my makeup off. Spots look worse after a shower because the hot water makes your pores open.

After a shower, I don’t even go near my (amazing) magnifying mirror. I put my creams/moisturiser on without looking. I don’t see my face all red and by the time I look in a mirror, my face has cooled and any spots have reduced in size.

Review what you’re putting on your face

Be honest – how many products are you putting on your face in a day? When I did this assessment, I realised I was:

  1. cleaning my face with a product (morning)
  2. putting 2-3 moisturisers on (morning)
  3. putting primer on (morning)
  4. putting make up on (morning)
  5. removing make up with a product (evening)
  6. putting 2 moisturisers on (evening)
  7. putting on night cream moisturiser (evening)

So that’s a minimum of 9 different products I was putting on my face per day. Your skin is only thin – it can’t possibly hold this much. I figured something must be irritating it so I started to slowly reduce:

1. how much of each product I was using (1 drop instead of 2)
2. reduce the total amount of products I was using.
3. not putting products on all over my face – taking care to reduce the products added to my oily bits (forehead) in a morning

Now my routine looks like this:

  1. cleansing my face with a product (morning)
  2. add 1x 2 moisturiser including SPF (morning) I’ve stopped moisturising my oily bits in a morning which has done wonders for stopping my forehead being so oily by the evening. SPF still goes on all over, though.
  3. add primer sparingly (morning) not all the time if I’m not wearing makeup
  4. add make up (morning) not all the time
  5. removing make up with a product (evening) I use The Body Shop Camomile makeup remover on my eyes, but for my face, I use a reusable Face Halo pad
  6. NEW: cleanse & tone (evening) – cleansing and toning take off every last trace of makeup/dirt from the day
  7. putting 2 moisturisers on (evening) any other products such as Retinol 3x weekly – I use the same products but I use 1 drop instead of 2 and I don’t use harsh products on my dry patches like I used to
  8. add night cream moisturiser (evening) unlike the morning, I put moisturisers on my oily patches which can be washed off in the morning and doesn’t make my oiliness worse during the day

My skin honestly feels like it’s breathing again and my spots have reduced from this routine.

Use clean towels

If when you wash your face, you dry it with the closest towel… stop! Your partner could have just used that to dry their feet. Or bum, urghhhh. The towel could have been sat wet for a time, collecting germs.

I never dry my face with a towel. I usually leave it to dry – it only takes 5 minutes. Or if I need to, I dap it with 2 small pieces if toilet paper. I never use something that’s already out, having been used already.

The same can be said if you use a reusable make up remover cloth. If you leave it out damp or wet, it’ll collect mould so it’s the last thing you want to use on your face.

Use clean pillow cases

I sleep for 7+ hours so that’s a lot of time my face is lay on something. If you have spots, the bacteria will rub off on to your pillow and stay there, so the next night, that bacteria will make its way back to your face.

I make sure to never sleep on the same side twice. I have spares so I don’t need to wash my pillow case and dry it before re-using.

Are you removing all your make up?

I’ve used Face Halo for a while now with The Body Shop Camomile butter make up remover to remove not only face makeup but also eye makeup.

My Face Halo’s have seen better days
The Body Shop Camomile butter – for removing make up

I therefore changed my routine a little. I still use the camomile butter on all my face including my eyes/face, but I also use a toner & cleanser afterwards to remove any last trace of makeup.

Clean your make up brushes

Easily forgotten! If you’re constantly hiding spots, you need to constantly be cleaning your brushes.

I use ISOClean to clean mine which takes literally minutes and they’re as clean as new.

Clean your make up brushes weekly or even daily

What make up are you using?

Do you have new spots appear during the day? If so, that could be a sign your make up is irritating your skin.

Your best bet is to try and see what works for you. Read online reviews and use https://www.skincarisma.com/ingredient-analyzer to check out the ingredients before you buy. It shows you any ingredients that could irritate your skin, in particular if you have spots, dry skin or oily skin.

What vitamins are you taking?

I’ve been taking biotin for hair growth. It works! But at the same time, too much, you guessed it, can bring on spots. I found this to be true. Since I’ve stopped taking a daily biotin vitamin, my spots have reduced. I now take only 2 per week.

Get a spot clearing gel

I’ve used Dermalogica Breakout Clearing Booster for putting on angry spots to help them disappear. I’ve also used Benzoyl Peroxide which kills the bacteria in spots, but it’s very strong and dries out skin, so use sparingly and be careful.

Update: March 2021

I’ve just started using polyester pillowcases which are soft enough to help improve your skin. They don’t soak in the lotions and potions you put on before sleeping, unlike cotton. I’m using them instead of silk, which isn’t cruelty-free. Have a read of my article where I discuss my new polyester pillowcases & show how my hair looks after sleeping. I was happily surprised!

• • •

Thanks for reading :) This article is tagged with:

Categories
Make up Skincare

Removing make up with Chloe Morello’s Face Halo reusable face pad – honest review

I’ve followed Chloe Morello for a while and noticed her promotions for Face Halo makeup remover that you can use only with water. They are kind on skin as they are made of white fibre strands,

“100 times finer than human hair to remove and trap makeup”.

Around the edge they have a black rim made of satin which is soft to touch.

Pricing

At $22 for a pack of 3, initially I thought they were expensive. But then I thought about it and considering makeup remover wipes are £2-3 for 20/30, is it really?

Considering you get “200 washes” out of each pad, not only is it better for the environment, it’s actually a cost-saving. It cost me £15.60 in total, so each one cost £5.20. You only need buy 3 packs of wipes and you’ve already gone over the price of 1 Face Halo. (That’s £0.26p per wash)  

The Body Shop cleansing butter is £10. They nearly always have discounts on their website. I got my latest batch with 25% off + free delivery.

My skin has improved

When I use this on my face, it feels lavish and like I’m actually treating my face each time. It doesn’t feel like it’s pulling on my skin and I never get any redness afterwards, proving how soft it is on my skin. Considering the skin around the eye is so delicate, this was really important to me. Especially as I’m moving into my 30’s, I need to take even more care of those soon-to-be wrinkles.

My skin has genuinely improved since using Face Halo. It’s so much smoother and looks fresher.

After-care

I don’t know what I expected, but considering I’ve been using them since the start of August, they are now looking – if being honest – quite gross. Every 2nd use I put them in the wash with my clothes then in the tumble dryer. I’ve never let the makeup sit on the Halo; I’ve always rinsed it after use. They are now stained which really puts me off using them.  The Face Halo website says:

If you give it a very quick hand wash right after using with warm water and soap the makeup will release easily.  If you leave it for a couple of days before washing it will take a little bit more time to release all the makeup.  In this case we like to rub two Face Halo’s together under warm water with some good soap (even a natural dish soap for heavier makeup), then throw into the washing machine!  

I have been doing this but they have still stained so I mustn’t have been doing it thoroughly enough. Maybe this is why they’ve bought out completely black Face Halos?

Overall

This will be my routine for a while. I absolutely love it. They go so well together. My face feels so clean I’ve actually stopped using moisturisers because my face doesn’t look like it needs it!

Update: 28 April 2019

I read up online how other fellow people are cleaning their Face Halos. From this advice I now:

  • clean after EVERY use – making sure it’s wet, I rub soap into the Face Halo. I rub the sides together to make a lather then after 30 seconds, I rinse. You’d be surprised at how much rubbish comes out.
  • I leave them on the radiator to dry in-between uses throughout the week
  • clean thoroughly in the main wash every week – I throw all 3 into my clothes wash each week.
  • I still use The Body Shop’s camomile on all my face but use a biodegradable wet wipe on my face and Face Halo on my eyes.

After a few months of getting a LOT of spots, I’ve stopped using Face Halo’s on my face. I just use them on my eyes, to remove mascara. After washing them with soap, I leave them on the radiator to dry. As it’s been warm, they haven’t been on, so they’ve been sitting there damp for a few days. This isn’t good, as bacteria loves damp conditions which could have been irritating my skin.

I’m not blaming these causing my spots, but since I’ve stopped using them on my face, I’ve noticed a small improvement. I still clean them as above, but I clean them much more thoroughly now.

Read about how I’m improving my spots and skin health.

Update: 16 February 2020

I’m still using (and loving) Face Halo – I got new ones for Christmas as I stopped using my previous ones due to their state! I’m being more rigorous now with my cleaning, making sure after each daily use I’m getting as much mascara out with soap as possible.

I was using The Body Shop’s Camomile cleansing butter with my Face Halo, due to reducing down the number of products I’m currently using on my skin, in an attempt to calm down my spots/acne. If you’d like to read more about other tips I’m doing to calm my skin, I’ve made a blog about it here. Face Halo gets rid of all my makeup without the need for the Camomile so it was an easy decision. I don’t have anything against the Camomile; it’s a great product, just not needed.

Update: 12 March 2021

Still using the same as above – using the pad on my whole face and the Body Shop camomile on my eyes only. I wash & re-use each pad once with soap (leaving on a radiator to dry in-between), then throw in the washing machine along with clothes. I clean my face with the pad first, then use it to get off mascara. I don’t use it on my eyes first as I don’t want to rub mascara all over my face!

• • •

Thanks for reading :) This article is tagged with:

Categories
Crafting or DIY

What is the difference between vegan and cruelty-free makeup?

There’s a difference in Vegan and Cruelty-Free products:

  • Vegan is when a product doesn’t contain any animal ingredients
  • Cruelty-free is when the product hasn’t been tested on animals

Facts about China

With the amazing efforts of the Humaine Society International, China changed their laws in 2014 to the following:

  • Foreign imported ordinary cosmetics – still require animal testing
  • Domestically produced ordinary* cosmetics – animal testing no longer an absolute requirement
  • Both foreign imported and domestically produced ‘special use’** cosmetics – still require animal testing
  • Domestically produced ordinary cosmetics for foreign export only – have never required animal testing
  • Any cosmetic bought in China via a foreign e-commerce website – has never required animal testing.

*‘Ordinary’ cosmetics include make-up, fragrances, skin, hair and nail care products. 
** ‘Special-use’ cosmetics include hair dyes, perms and hair growth products, deodorants, sunscreens, skin-whitening creams, and other products that make a functional claim on the label.

Read the full article on hsi.org.

This means if a brand who is cruelty-free in the UK starts selling and importing products to sell in China, they are then tested on animals so the company is no longer Cruelty-Free. This happened to the brand Nars.  

Brands who test on animals

This list is from the Peta website dated 16.05.2018. It includes big brands such as:

  • Air Wick
  • Arm & Hammer
  • Aussie
  • Aveeno
  • Avon Products
  • Balenciaga
  • Benefit Cosmetics
  • Bobbi Brown
  • Braun
  • Burberry
  • Calgon
  • Calvin Klein
  • Caudalie
  • Chloe
  • Clearasil
  • Clinique
  • Diesel
  • Dior
  • Dove now cruelty-free!
  • Durex
  • Elizabeth Ardon
  • Estee Lauder
  • Febreeze
  • Fendi
  • Garnier
  • GLAMGLOW
  • Galo
  • Hugo Boss
  • Johnson & Johnson
  • Kiehl’s
  • L’Oreal
  • Lancome
  • Listerine
  • MAC Cosmetics
  • Max Factor
  • Maybelline
  • Michael Kors
  • Miu miu
  • Nars Cosmetics (they used to be Cruelty-Free but started selling in China)
  • Neutrogena
  • Nice and Easy
  • Nivea
  • Olay
  • Oomph!
  • Origins
  • Pampers
  • Pantene
  • Revlon
  • Schwarzkopf
  • St. Ives
  • Tresemme
  • Vaseline
  • Veet
  • Viktor & Rolf
  • Wella

The list goes on. For the full list, check out Peta’s website. Do the right thing and don’t buy from these brands. There’s no reason good enough for putting animals through harm and suffering.

Check which brands you use are Cruelty-Free on the Leaping Bunny website. 

Brands who DO NOT test on animals (hurrah!)

I’m chuffed to say this list is a LOT bigger than the previous one. Here are a few popular brands featured on the PETA website, but you can see the full list here.

  • Acure
  • Adaline & Co
  • Anastasia Beverly Hills
  • BareFace Cosmetics
  • Barefaced Beauty
  • Basic Bitch Cosmetics (gorgeous Lucy from Made in Chelsea!)
  • Bath Bomb Babes
  • The Bodyshop
  • Botanical Skin Works
  • Burt’s Bees
  • Chi Chi Cosmetics
  • Dermalogica
  • Dove – new! hurrah! See their statement here
  • Dr Roebuck’s
  • Dr PAWPAW
  • Iconic London
  • Illamasqua
  • LUSH Cosmetics
  • Mabel & Meg
  • Makeup Geek
  • ModelCo
  • MUA Makeup Academy
  • Ted Baker
  • The Honest Company
  • The Organic Skin Co
  • The Ordinary

High-Street Vegan and Cruelty-Free makeup

  • The Body Shop – Vegan and they do NOT test on animals. Everything ‘beauty’ you can think of including make-up, moisturisers, perfume.
  • B. Cosmetics (look in Superdrug) – Makeup including concealers, foundation, bronzer, primer, brows, blush, mascara, etc.
  • Barry M – the majority of their products are Vegan. A small number contain beeswax. They do NOT test on animals. Look in Superdrug – they sell a range of makeup including highlighter, foundation, concealer, mascara, primer, eyeshadow, nail varnish, etc.
  • HUDA Beauty – Most products are vegan. They do NOT test on animals. Products include mascara, eyeshadow, lipsticks, makeup brushes, etc.
  • GOSH – Some products are vegan and the list is here. They do NOT test on animals.
  • Dove – cruelty-free – can’t find info relating to if they are vegan
  • Kat Von D – Vegan and they do NOT test on animals
  • Optimum – Eye and face creams – check out their products on Superdrug 
  • Revolution Beauty / I Heart Revolution – Cruelty-Free. Not all products are vegan but some are – check out the Vegan section on their website for a full list
  • Solaite – Sun creams are vegan, see Superdrug’s website for details
  • Superdrug’s own branding has several vegan products (see their website filter here) – such as body spray, toothpaste, cleansing wipes, hair conditioner, shampoo, beard oil, pre-shampoo treatment, facial spritz and deodorant.
  • Too Faced – Cruelty-Free. Not all products are vegan but some are – see their vegan-friendly range here which includes the very popular ‘Born This Way’ foundation, mascara, bronzer, eyeliner, primer, etc.
  • Urban Decay – Vegan and they do NOT test on animals – see their cruelty-free makeup here which includes setting spray, foundation, concealer, mascara, lip gloss, etc.

Toothpaste

  • The Co-operative sell their own-branded toothpaste – both Vegan and Cruelty-Free
  • Sainsburys and Tesco sell their own branded Vegan toothpaste (unable to find info if it’s Cruelty-Free too)
  • Advanced Pro have some toothpaste Vegan and Cruelty-Free

Products I’d recommend

The Body Shop fresh nude foundation 
It stays on all day (even on my forehead which is oily) It isn’t heavy but can be if you apply a few coats.

The Body Shop Vitamin C Skin Reviver
I use as a primer before I put my makeup on. It helps my skin look more awake.

The Body Shop Vitamin C and BB Cream for moisturiser

Dermalogica clay cleanser (for oily skin)
I use as a facemask but also as a 2/3 times-weekly to give my skin a good clean.

Mabel + Meg Lumilixir Serum 
I can’t rate this product highly enough. The company is Vegan & Cruelty-Free. Check out my article where I share the benefits I’ve found

Mabel and Meg Lumilixir Serum

The Ordinary
I bought these 3 beauties from LookFantastic for a HUGE grand total of…. £17.60. Seriously, I paid £17.60 for 3 bottles, all 30ml each. Absolute bargain. I use the Lactic Acid twice a week; and the other 2 I use 1 or 2 drops each before bed. My skin has never looked so fresh or plump.

Thank you to Michelle at BeautyEditor for her awesome review which helped me decide what to buy.

Need to check a brand/product?

First, try finding the company on Peta’s list. If you don’t get any joy, visit the brands’ website or do a Google search “Brand vegan” and I’m sure you’ll get the answer.

Check which brands you use are Cruelty-Free on the Leaping Bunny website. 

Making the change

It can be hard changing over to Vegan/Cruelty-free products. It feels like a minefield at first especially if you have certain products you’ve used forever and absolutely love.

Hopefully, this list has helped you understand there’s still a lot to do, and knowledge to share to make more people aware of what they’re putting on their skin.

What should you do if you’ve got products to use up?

My advice would be to use up everything you have. Use this time wisely to get to know the products you’ll replace them with.

Update: 17th February 2020

I’ve been using Aurelia products and absolutely love them. They are of course cruelty-free and some are vegan. One of the products I’ve been using is their botanical cream deodorant which is vegan (hurrah). See the vegetarian/vegan confirmation on the Aurelia website.

Dove are now cruelty-free! Hurrah! I have updated the lists above.

• • •

Thanks for reading :) This article is tagged with:

Categories
Skincare

How I protected and nourished my hair on the beach with coconut oil

My hair is up all the time on holiday. It’s never down and I never bother to straighten it. I’m also, always in the sea, so by the end of the day, my hair not only looks like rat tails, it feels horrible.

I bought coconut oil before I went which I’d heard was good at keeping hair nourished during beach holidays. I used it daily throughout my holiday and thought I’d share my very happy experience with you.

After swimming in the sea, you should take a shower. Salt water not only dries out your skin and hair, it leaves a sticky residue behind (gross). After each swim, I took my hair down so it was loose. I stood under the shower nearby and let the fresh water wash all over my hair. I didn’t shampoo it or anything. After a few minutes, I went back to my seat and brushed it until it was lug-free.

Taking about a pea-sized amount (I have long hair), I warmed it up in my hands. I then ran my fingers through the top and ends of my hair – being careful to avoid the roots as it can make roots greasy.

Once done, I scooped it up and put it in a french plait down my back. I like the French plait because it keeps hair in but it isn’t tight on my head, like a ponytail. When I undid it later in the day, it gave me lovely wavy hair.

Here’s a pic of me in the evening, back from the beach. This is after I’d had my hair covered in coconut oil all day. It was SO smooth, smelt amazing and was really conditioned. I hadn’t even washed it; this is when the coconut oil was still in my hair. All I did was brush it and put it up in a ponytail. It had dried on the beach with the coconut oil in it.

Not only am I using it but my Husband started too. He used it once after he’d been in the sea to de-fluff his hair. Guess what? Yep. He started using it in the evenings too instead of hair gel, and continued to use it even now we’re back from holiday.

I’ve used it as leave-in-conditioner a few times since I’ve been back, to give my hair a boost after being out in 35 degree heat for 2 weeks. It looks really shiny and moisturised.

As long as you don’t use too much, it makes styling hair so much easier. I sometimes wave my hair with straighteners. I’ve done it with coconut oil in my hair and the waves have never been as bouncy or as long-lasting. From the reviews on the Superdrug website, some ladies use it for their bleached-hair to keep it from drying out.

The coconut oil is solid in the container, so you need to pick it out with a nail.

I bought the coconut oil from Superdrug for £1.65. It’s cruelty-free and vegan, which makes this my new favourite product.

I’d definitely recommend it, especially as it’s cruelty-free! If you use it, drop me a comment and let me know how you get on.

More uses for coconut oil – further reading

Not just for beauty but potential nutritional value too. Check out FocusPerformance’s article | Coconut oil, Good or bad? 

Could coconut oil be used for hair growth? Hairguard.com discuss the benefits, side effects and uses – worth a read if you’re worried about losing your hair.

• • •

Thanks for reading :) This article is tagged with:

Categories
Make up Skincare

How I use make up to help cover under eye bags and puffiness

I’ve always been obsessed with make-up. Not so much with wearing it; just how much it can change how someone looks, and how it can make you feel.

I got married in 2014 and did my own make-up, even after having a wedding trial. I don’t wear a lot of make-up, so when the trial lady (who didn’t have much make-up on herself) seemed to absolutely lash the foundation on, she answered my hmmm with… “It’s quite heavy yes, but you will look amazing on the photos”. This didn’t fill me with comfort, as I’d rather not be uncomfortable all day thinking about how much make-up I’m wearing. Plus I wanted my Husband to actually recognise me when I got to him in church!

I put into action a challenge to find my ultimate go-to make-up routine, that I’d feel comfortable with on my wedding day; that would stay on all day; and would be relatively quick to put on.

I’ve always had under eye bags and puffiness, for as long as I can remember. The last few years I’ve attempted numerous serums, patches, creams, even cold tea bags / cucumber / tea spoons, but nothing has made me think “WOW – this works”. I have a healthy diet, and sleep well – even my folks don’t have them, so I had to come up with something that’d make me feel OK again.

Patchology eye patches - dark circles and puffiness - Wedding DIY Make Up tutorial without contouring - Ahoy Designs
Patchology comes with 30 pairs of eye patches and a little spoon to help separate them

I’m always on Instagram checking things out, when I stumbled across a photo of Olly Murs with some under eye patches on. I did a search and found ‘Patchology’ – I’m not sure if he was wearing these, but I decided to investigate. A search on Amazon.com and I discovered 13 reviews (at the time of writing) and 5/5 stars for Patchology Flashpatch Eye Gels. At $50 + delivery, yes; it’s a pretty expensive beauty item, but this didn’t put me off! So off and I went and purchased a month’s worth.

When they came, I instantly popped them in the fridge. It doesn’t say to do this, but I still use the cold tea spoon idea because it feels so good, and wakes my eyes/face up no end. Putting them in the fridge definitely helps the patches wake my eyes up. The instructions say to leave them on for 5 minutes. I leave them on for about 30 minutes whilst I’m doing other things.

Seeing as though it took me a while to figure out my own make-up routine, I thought I should write about it, as someone somewhere might benefit from even a small part of what I do, and how I do it – in particular covering dark circles and puffy bags. The make-up used throughout is animal cruelty-free 🙂 Some of the items are expensive, however, as they last so long, to me it’s worth it. The Laura Mercier concealer I’ve got was expensive to purchase, but I bought it in January 2015 and still have over 1/4 left – and I use it every day.

Even though I don’t use contouring, I’m forever watching videos on it – it’s incredible what can be done nowadays. I wouldn’t like to use contouring on myself, because it looks quite heavy. Great on film, photos – but in real life, it’s not for me. I prefer a light make-up routine, that I’ll go through step-by-step now. 

You’ll find the materials I’ve used at the bottom of this tutorial. 

Step 1 – prep

Before I do anything, I wash my face. I do this with a facial brush I found on eBay for £8. It spins round, which makes sure every last bit of dirt comes off my face. I use the small brush (middle) with soap. It leaves my face feeling amazingly clean and ready for the day.
Cleaning facial spinning for clean skin - Wedding DIY Make Up tutorial without contouring - Ahoy Designs

I also pop eye drops into my eyes at this point to get rid of any redness. It also helps to wake them up.

Step 2 – Patches

I leave these on for 30 minutes, whilst I’m doing other things. Although you can just leave them on for 5 minutes to get amazing results.

Afterwards remove any excess serum with a wipe.
Using patchology eye patches - Wedding DIY Make Up tutorial without contouring - Ahoy Designs

Step 3 – Moisturise

I use 2 moisturisers before I apply my make-up. I use a small blob of each & apply to my face in circular upwards motions. The Body Shop Vitamin C skin reviver makes me look refreshed and awake; Vitamin C is great for skin. The Body Shop Vitamin E BB Cream gives my skin a gorgeous glow (but not too dewey) and gives a slight coverage. Once these have settled in your skin, then it’s time for make-up!

The Body Shop Vitamin C and BB Cream for moisturiser - Wedding DIY Make Up tutorial without contouring - Ahoy Designs

Step 4 – Top lashes mascara

At this point I put on mascara but only on the top lashes. The bottom ones come later. I do it this way so I don’t have to wait for the bottom lashes to dry before I start on my foundation/concealer, and also as I’m not very neat, it’s quick and easy to remove any mistakes with a cotton bud!
Remove excess mascara - Wedding DIY Make Up tutorial without contouring - Ahoy Designs

Step 5 – concealer

I use Laura Mercier Secret Camouflage because it includes 2 colours; a light and dark. Use the darker (it isn’t actually a dark colour, it’s just slightly darker than the light!) underneath the eye but DO NOT touch or put ANY concealer on the actual puffiness of the eye. Only apply it to the dark bags, and next to the nose.

Blend concealer and add a cream eye liner - Wedding DIY Make Up tutorial without contouring - Ahoy Designs

Add cream eyeliner to give a light effect to your eye area. White is also a popular colour, but I feel for me, cream is more of a natural skin colour. Steer clear of black as this will emphasis the darkness of your bags.

Blend in the concealer using a blender brush. Be very gentle, and don’t rush. I start with the darker colour and blend my nose first, then I work outwards. The lighter colour at the edges will help to highlight your face and take the attention away from your bags.

I then pat very lightly & gently foundation over the top of the black under eye bags, not the puffiness. This helps to settle the concealer. Use the same blender brush and lightly sweep from your nose outwards. I use Mac Studio Fix in NC25 for this.

Step 6 – Blush

Get your pout on! Put the blush brush up against your face to help visualise where you’ll be adding it. Then sweep using an outwards motion gently, not adding too much blush with each sweep. It should slowly become more noticeable as you keep applying.

Don’t just add blush to your cheeks – use what’s left on your brush to lightly brush your forehead, nose and chin. This will give the illusion of a tan – winner!

Finish up by adding mascara to your bottom lashes, and I personally use a peach shimmer eyeshadow to give my eyes yet another highlight.

Adding blush - Wedding DIY Make Up tutorial without contouring - Ahoy Designs

Step 7 – finished result

Unfortunately miracles don’t happen and I can’t hide ALL of my black under eyes / puffiness. However, I find using the steps above helps me feel so much better about myself, and not care as much. If you take the attention away from your bags by having your other features look nice, it will help your confidence no end. I use these steps on a daily basis, for work, lunch, meet-ups with friends. If I’m going out, I’ll add more blush, eyeliner and darker eyeshadow.

I find the blush really helps to make you look healthier and really finishes off your make-up.

Finished result with no contouring - Make up used throughout this tutorial - Mac, Body Shop, Rimmel, Laura Mercier, Collection, Patchology, Tesco - Wedding DIY Make Up tutorial without contouring - Ahoy Designs

Materials

Okay so here’s a list, in order, of everything I’ve used in the above make up tutorial.

Make up used throughout this tutorial - Mac, Body Shop, Rimmel, Laura Mercier, Collection, Patchology, Tesco - Wedding DIY Make Up tutorial without contouring - Ahoy Designs

  • Ultimate Spin Brush Cleansing System (eBay £8!)
  • Patchology Flash Patch eye patches (Amazon.com)
  • Tesco Eye Brightener drops
  • Body Shop Vitamin E Cool BB Cream
  • Body Shop Vitamin C Skin Reviver
  • Collection Big Fake Curves mascara
  • Body Shop brow & liner kit 02
  • Laura Mercier Secret Camouflage SC2
  • Rimmel Scandal Eyes eyeliner, 005 Nude
  • MAC Brush 194
  • Body Shop eyeshadow blender brush
  • MAC Studio Fix NC25
  • Body Shop Shimmer waves blush 01
  • Body Shop Blusher brush
  • Rimmel Stay and Glossy lipgloss 160 “Stay My Rose”

And that’s it folks… Thanks for reading and I hope you’ve been able to take away something from this tutorial!

• • •

Thanks for reading :) This article is tagged with:

My photo, hi I'm Rachael

Hi, I'm Rachael.

This is my beauty website where I review lots of different products, from make up, to CBD coffee and vegan moisturiser. I've been using products for over 20 years, so I hope I've gathered some tips and tricks to share, plus I'm always learning so I'll be sharing them too. I have oily-skin, that's acne prone, so join me as I navigate this new age being a millennial!